
Self Driving Car using Tensorflow
A Tensorflow project based on Nvidia's Self Driving Car model.

Write blogs about software and data.
Welcome👋, Today I will walk you through a Tensorflow project where we'll build a self-driving car based on Nvidia's Self Driving Car model.
Prerequisites
- Unity - Go to Unity and download the Unity installer. Choose the right version as per your system requirement. Start the installer and follow the necessary to successfully install the program.
- Simulator - Visit github/udacity and follow the instructions mentioned in the Readme.md to download and run the simulator as per the system requirements.
- Anaconda/python env - Create a python environment for the model using conda or python.
- Tensorflow - Install TensorFlow after creating an anaconda env. Visit hereto know more.
Running the Simulator
- When we first run the simulator we will see a screen similar to the one shown below.
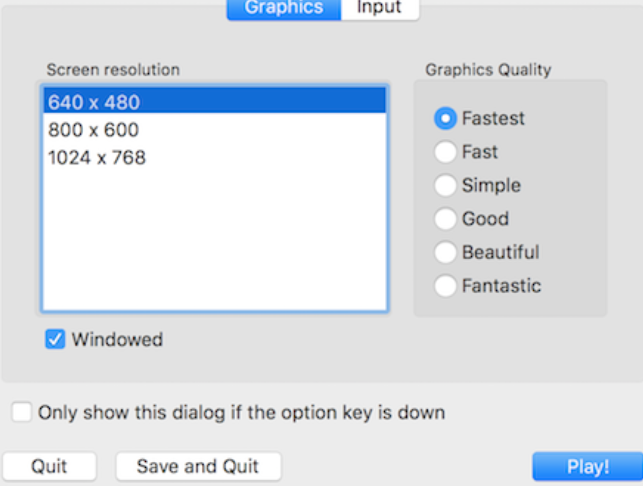
- Choose the resolution (I suggest 640x480) and graphic quality.
- Then start the simulator by pressing the Play button.
- Next, we'll see a screen with two options, Training Mode and Autonomous Mode.

- Select a track and choose Training Mode.
Training Mode
This mode records the images produced by the 3 cameras (left, centre, right) present on the front of the car. All the captured image are saved in the local disk along with the steering, throttle, brake and speed values in a CSV file named driving_log.csv.
For more accurate results, run the car for 8-10 laps.
The Goal
The goal of the project is to run the car automatically using deep neural networks in the Autonomous Mode using all the data obtained after running the Training Mode.
Let's Start Coding!
Exploratory Data Analysis
- We import the data and necessary libraries.
import pandas as pd
import numpy as np
import os
import cv2
import tensorflow as tf
import matplotlib.pyplot as plt
from tensorflow.keras.models import Sequential
from tensorflow.keras.layers import Convolution2D, Flatten, Dense, Dropout
from tensorflow.keras.optimizers import Adam
- Load the data and view the head using
df.head().
columns = ['center', 'left', 'right', 'steering', 'throttle','brake', 'speed']
df = pd.read_csv(os.path.join('E:\dev\SelfDrivingCar','driving_log.csv'), names = columns)
df.head()

- Plotting the steering values for visual insights.
plt.hist(df.steering)
plt.show()
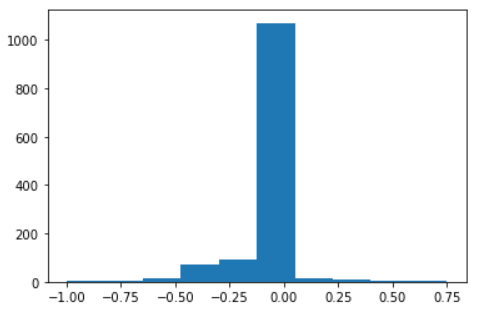
- We can also check its skewness by running the code.
print("Skewness of the steering feature:\n", df['steering'].skew())
We are going to use steering column as the dependent variable. Our goal will be to predict the steering values from the images produced by the simulation.
- Checking the image using OpenCV
img = cv2.imread(df['center'][0])
img = cv2.cvtColor(img, cv2.COLOR_BGR2RGB)
plt.imshow(img)
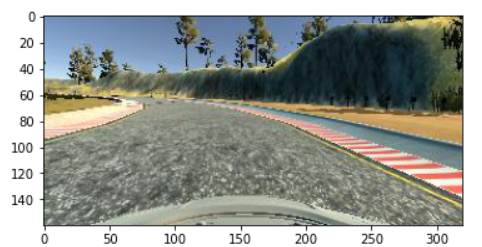
- The image is okay, but there are many unnecessary objects like mountains, trees, sky, etc. that we can remove from the image and only keep the road track for training.
Image Preprocessing and Data Augmentation
Before moving to the training process, it is important to remove unwanted data and keep the images simple for training the model. Image preprocessing may also decrease model training time and increase model inference speed.
Image Augmentation is the process of creating more data for training from the already available ones to obtain good results and prevent overfitting.
- Defining a function
image_preprocessing()that accepts the path of the image as input, to crop the image and convert the images to YUV.
def image_preprocessing(path):
    # cropping image
    img = cv2.imread(path)
    cropped_img = img[60:160,:]
    # color conversion from BGR to YUV
    final_img = cv2.cvtColor(cropped_img, cv2.COLOR_BGR2YUV)
    # application of gaussian blur
    final_img = cv2.GaussianBlur(final_img,(3,5),0)
    # resize image
    output = cv2.resize(final_img, (300,80))
    # normalizing image
    output = output/255
    return output
- Create a function
data_augmentation()that accepts the image processing function and outputs augmented images and augmented steering features.
def data_augmentation(img_process):
    images = []
    steerings = []
    # for each row in the dataset
    for row in range(df.shape[0]):
        # for ith column
        for i in range(3):
            # splitting image path and filename
            fileName = mod_name(df.iloc[row, i])
            filePath = './IMG/'+ fileName
            # processing the images
            img = img_process(filePath)
            images.append(img)
            steerings.append(df['steering'][row])

    # image and measurement augmentation
    augmented_images, augmented_steerings = [], []
    for image, steering in zip(images, steerings):
        augmented_images.append(image)
        augmented_steerings.append(steering)

        # horizontally flippping the images
        flipped_img = cv2.flip(image, 1)
        augmented_images.append(flipped_img)
        # changing the sign to match the flipped images
        augmented_steerings.append(-1*steering)

    return augmented_images, augmented_steerings
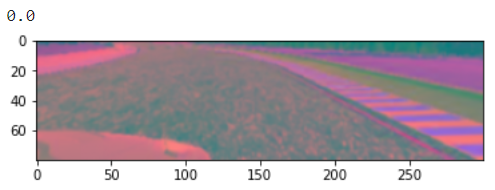
- We store the augmented images and augmented steering values in two different variables. And print the values along with the processed image to check if everything works fine.
- We use matplotlib to view the images.
augmented_images, augmented_steerings = data_augmentation(image_preprocessing)
print(augmented_steerings[100])
plt.imshow(augmented_images[100])
plt.show()
Training and Validation
The next step is to prepare the training and validation dataset.
- First, we store the augmented images and augmented steering values separately in X and y variables.
X = np.array(augmented_images)
y = np.array(augmented_steerings)

X.shape
(7698, 80, 300, 3)
- We then split the dataset for training using the
train_test_splitmethod from the sklearn library.
from sklearn.model_selection import train_test_split
xtrain, xval, ytrain, yval = train_test_split(X, y, test_size = 0.2, random_state = 1)
print('Train images:',len(xtrain))
print('Validation images:',len(xval))
Train images: 6158 Validation images: 1540
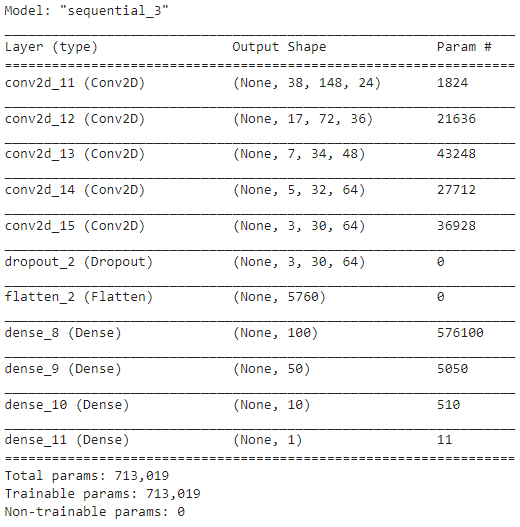
Model Building and Training
The model architecture is based on the Nvidia's Neural Network for Self Driving Car.
model = Sequential()
model.add(Convolution2D(24,(5,5),(2,2),input_shape=xtrain[0].shape))

model.add(Convolution2D(36,(5,5),(2,2),activation='elu'))
model.add(Convolution2D(48,(5,5),(2,2),activation='elu'))
# since the images are very small, we are keeping the stride small and not 2x2.
model.add(Convolution2D(64,(3,3),activation='elu'))
model.add(Convolution2D(64,(3,3),activation='elu'))
model.add(Dropout(0.2))
model.add(Flatten())
model.add(Dense(100,activation='elu'))
model.add(Dense(50,activation='elu'))
model.add(Dense(10,activation='elu'))
model.add(Dense(1))

model.compile(Adam(learning_rate=0.0001), loss='mse', metrics=['accuracy'])
print(model.summary())
Early stopping the model to prevent overfitting.
callback = tf.keras.callbacks.EarlyStopping(monitor='val_loss', patience=5)
history = model.fit(xtrain, ytrain, batch_size=128,validation_data=(xval, yval), epochs=100, callbacks=[callback])
Epoch 1/100 49/49 [==============================] - 34s 694ms/step - loss: 0.0404 - accuracy: 0.7660 - val_loss: 0.0182 - val_accuracy: 0.7786 Epoch 2/100 49/49 [==============================] - 29s 592ms/step - loss: 0.0207 - accuracy: 0.7787 - val_loss: 0.0170 - val_accuracy: 0.7786 Epoch 24/100 49/49 [==============================] - 28s 565ms/step - loss: 0.0133 - accuracy: 0.7787 - val_loss: 0.0142 - val_accuracy: 0.7786Saving the model.
model.save('model.h5`)
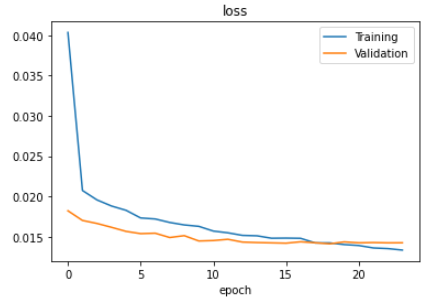
Evaluating Training and Validation loss
Plot the training loss and validation loss using matplotlib.
plt.plot(history.history['loss'])
plt.plot(history.history['val_loss'])
plt.legend(['Training', 'Validation'])
plt.title('loss')
plt.xlabel('epoch')
plt.show()
Conclusion
The overall model is not an exact duplicate of the original Nvidia model, it is just an implementation of the idea behind the original, so there is still room for improvement. The accuracy and losses of the model can be further improved by proper hyperparameter tuning and data preprocessing. In my case, I have considered only 2 to 3 laps of the track to collect the images for training data. So, increasing the number of laps will surely affect the model accuracy and losses. And I have converted the images to YUV, but if we consider removing the colours and keeping only the edges or converting the images into greyscale, we might get improved results with our model.
🌎Explore, 🎓Learn, 👷♂️Build. Happy Coding💛


